During our final little fixes in post production, Katy and I encountered a major hiccup in the works. Whilst i was rendering out the need clips from After Effects, we were unaware that Katy's preferences weren't the same as mine, as her program was set up to interpret footage at 30 fps whereas mine was set to 24. This caused the footage to run quicker than originally planned and messed up the lip sync. However, with us running so close to the deadline, we were unable to fix this problem without running over the deadline.
Katy and I are both upset about this and know that we have handled things poorly towards the end of this project. We didn't manage our time very effectively and this has caused us to make silly mistakes that could have been otherwise avoided. Having said this however, it is definitely something I have learnt from and I am determined not to make the same mistake again.
Monday, 9 May 2016
Applied Animation: Adding Foley Sounds
Katy and I sat down together and searched through the BBC sound library to find foley sounds that we felt would be appropriate for our animation. After searching through many, we settled on using two separate rural environment noises. We had decided that we wanted the environments to sound distinctively different from one another to help enforce the idea that these were two similar yet different environments.
We feel that the foley we found also helps to set the mood within each environment, with the Boar environment containing British birds and sounds of the countryside, whilst the Wolf environment contains more exotic sounds, as this is supposed to be set in eastern Europe.
We feel that the foley we found also helps to set the mood within each environment, with the Boar environment containing British birds and sounds of the countryside, whilst the Wolf environment contains more exotic sounds, as this is supposed to be set in eastern Europe.
Applied Animation: Post-Production
Now that I have completed all of my animation, I can focus purely on post-production and work towards competing the animation on time. Like I said before, this was a process that was taking a lot longer than I expected and it was putting me behind time. I had to create individual Alpha layers in order for the track Mattes to work and it was this that was taking me so long to complete.

In order to help me move along with the post-production, Katy had kindly agreed to take charge of credits and titles, whilst I continued with the alpha layers. I found this task extremely frustrating and tedious and in hindsight, I would have benefitted from completing this task sooner rather than waiting and giving myself only 2 weeks.
Despite this, I did manage to get the alphas done on time, however, there isn't a huge window to fix any problems if any occur. Time management is something that I have struggled with throughout this year and I feel that it is something both Katy and I have dealt with quite badly throughout this project. However, this has taught me the importance of keeping on top of a schedule and I will definitely work towards this in the future.

Despite this, I did manage to get the alphas done on time, however, there isn't a huge window to fix any problems if any occur. Time management is something that I have struggled with throughout this year and I feel that it is something both Katy and I have dealt with quite badly throughout this project. However, this has taught me the importance of keeping on top of a schedule and I will definitely work towards this in the future.
Applied Animation: Progress Meeting 25/04
During our final crit, Katy and I hadn't been able to show much, as we had fallen behind by a considerable amount. However, we did show what we had and received some positive feedback about what we had so far.
With the fact that we were behind in mind, Katy and I spoke about how much we had left and which course of action would be the best to take. This is when we decided that we should change our approach to give ourselves the best opportunity possible to finish. Originally, Katy and I were going to animate the robin in our respective scenes, however, with post production taking up more time than we imagined it would, I would focus on post production, whilst Katy would take on the Robin.
With the fact that we were behind in mind, Katy and I spoke about how much we had left and which course of action would be the best to take. This is when we decided that we should change our approach to give ourselves the best opportunity possible to finish. Originally, Katy and I were going to animate the robin in our respective scenes, however, with post production taking up more time than we imagined it would, I would focus on post production, whilst Katy would take on the Robin.
Applied Animation: Animation Progress
In order to begin animating, I decided that it would be a good idea to separate the body parts on separate layers. This allowed me to focus on certain elements of my character that were moving whilst others remained stationary and it also made my workspace tidy and organised. This process reduced my work load by a fair amount and gave me the opportunity to focus on lip synching, as this is something I have never done before.
I feel that the animation I did throughout was fairly easy, considering I've never focused on character animation before, however, I did struggle with the body language of the wolf, as it was hard to find relevant and useful reference. In particular, I struggled with the paws when I wanted them to be lifted, as I didn't have any reference to go on.
I feel that the animation I did throughout was fairly easy, considering I've never focused on character animation before, however, I did struggle with the body language of the wolf, as it was hard to find relevant and useful reference. In particular, I struggled with the paws when I wanted them to be lifted, as I didn't have any reference to go on.
Applied Animation: Post-Production Test
With Katy under way with animating the boar scenes she was responsible for, I decided that it would be a good opportunity to conduct a post production test to see how track mattes would work to aide us in our goal. Track Mattes are something that I've never used before however, I found them very straight forward to use.
The only problem that I will have with this method is the fact that I will have to create an alpha for each character and I see no other way around this than to do it frame by frame for some areas. This may take a lot more time than we originally thought, but I feel that it will be okay if we factor enough time in for it.
The only problem that I will have with this method is the fact that I will have to create an alpha for each character and I see no other way around this than to do it frame by frame for some areas. This may take a lot more time than we originally thought, but I feel that it will be okay if we factor enough time in for it.
Overall, I'm pleased with the outcome and I feel that we have been able to achieve what we wanted to do, Katy agrees that this is the best use of our textures and we both feel that this will work well for what we want to achieve.
Monday, 18 April 2016
Applied Animation: Scene Split
Now that we are in a position to animate, we sat down and went through which scenes we would each be animating. We had decided early on that we would each take a character, Katy taking the boar and me the wolf, as it would be easier this way to produce consistent animation for the characters and the overall finish of the animation would be cleaner. This left the choice down to who wanted to animate more than the other, as the wolf character has more speech than the boar. With this in mind, we decided that I would take the wolf, as Katy felt that she would animate slower than I would and she felt more confident with the boar character. I was fine with this, as I felt confident that I could handle the extra animating.


Because of this extra animating and the fact that I am doing post, Katy is taking the titles and credits to even out the workload. We will also animate the robin in our own scenes, as it will make it easier for the two of us. I feel good about the work split and I am happy with our roles.


 |
| Scenes I have to animate |

 |
| Katy's scenes |
Applied Animation: Final Characters
Now that we have made the amendments to our characters and I have drawn up the final environments, I thought it would be useful to draw up the final characters and create a colour sheet for us to refer to whilst animating to help maintain colour consistency throughout the project.
I also made a note of the brush size we would be using, just in case there was any confusion throughout production. By doing this, I hope to minimize my work load in post, as the characters should already have the correct colour line work and the correct fills before they get passed onto me for post.
 |
| Colour Sheet |
I also made a note of the brush size we would be using, just in case there was any confusion throughout production. By doing this, I hope to minimize my work load in post, as the characters should already have the correct colour line work and the correct fills before they get passed onto me for post.
However, I did notice that when I loaded this up on a computer at uni, the Robin's textures are way too saturated and I will need to come to back to this before we move on to animate the Robin, but we are aiming to animate the robin last, as for now I can focus on animating my character and solve this when I reach the robin.
Sunday, 17 April 2016
Applied Animation: Making Changes
In relation to our Interim Crit, I went away and made the adjustments to the boars texture and colours as suggested. I feel that this boar works a lot better than the previous ones, as it stands out from the background and it is clear to the audience. The colour also makes the boar the centre of attention, unlike before when you got distracted by the background.
I will now draw up the final characters and create colour sheet for us to refer to whilst animating.
 |
| Look Test |
I will now draw up the final characters and create colour sheet for us to refer to whilst animating.
Applied Animation: Interim Crit
During our interim crit last week, Katy and I showed our peers what we had done since our pre-production crit. We started with our lip sync tests and whilst people thought they were good, they did mention that they would have liked to have seen more behaviour in there, however we did mention that we had only had a chance to animate the mouth so far, as we wanted to create a set of mouth layers that we could use throughout out entire animation, rather than animating each mouth separately. The group agreed that this was a good idea and felt that it would help to make our task that little bit easier, but we should also remember the importance of human mannerisms when we are animating.
We also discussed our environments. I had created a number of look tests for both the boar and the wolf environment, which we showed the class to gain a better insight into which ones worked well and which ones didn't. Whilst people agreed with us that the wolf with the darker shade on top worked best within its environment, they weren't so sure about the boar, as they thought that it blended in too much with trees. This is something I also believed to be a problem and was unsure how to fix the problem. However, it was suggested to us that we re-explore our idea of a purple boar, as this would work really well within the environment and would also add to our aesthetic. This is definitely something I am going to experiment with, as I feel that it would be a very nice solution to our problem.
As a final note, we discussed what we had in mind for foley and background sounds. We had decided that we weren't going to have any music, as we feel it would distract from the overall animation, which our peers agreed with and we will search the BBC sound library to gather a collection of foley sounds we feel are appropriate for the environments. On top of this, if we get the chance, we will attempt to record our own foley sounds.
Overall, I feel that we are in a good position despite the fact that we are a few weeks behind our schedule. If we focus on beginning production, I feel that we will be able to turn it around and get ourselves back on track.
Thursday, 14 April 2016
Responsive: Evaluation
As a whole, I have found this project to be beneficial and challenging in many ways. It hasn’t necessarily challenged me in terms of my animation skills, but it has challenged me in other ways, such as working as a team member and working within very slim time frames. It has also provided me with an opportunity to work on my animation skills that I felt weren’t as strong as others, such as timing and spacing. Not only this, but this module has pushed me out of my comfort zone and encouraged me to find new ways to solve a brief. I feel that I have progressed both as an individual and an animator throughout this module, and I have learnt a lot about myself and how I cope with new pressures and working on multiple projects at one given time.
In terms of animation skills, this module has allowed me to take a step back and focus on developing skills that I felt would benefit future work. One of the skills I have been able to work on is my character animation. For the first brief I completed, I focused upon the character and looked into body movement and body language more closely than I had in previous projects. I found that whilst doing this, I also learnt a lot about timing and spacing and how, when it is applied correctly, it can make a huge difference to how that character moves. I am really pleased with what I learnt from completing this brief and I feel that I have gained a stronger understanding of timing and spacing that I can apply to other projects, such as Applied Animation.
Another aspect I feel that I have developed is character design. ONFORM provided me with the opportunity to work upon my skills as a character designer, which I feel it did so, however, I don’t feel that it worked as well as I initially thought. Whilst it helped me with character design, it helped me more with idea generation and encouraged me to create ideas more quickly each time. Although it didn’t fully achieve what I had hoped it had, it did provide me with practice in drawing digitally, which is something that will benefit me in future projects, as I predominantly work digitally. I also feel that this brief is the one in which I found the most improvement. It is evident throughout my responses that my line work becomes stronger, I become more confident with my drawings, and I begin to think of more complex ideas. I also found that as the brief progressed, I was able to generate ideas much more quickly and I was also able to complete the drawing much more quickly too.
A final skill that individual practice has resulted in me developing, is applying the principle of timing and spacing. This is something that I have always understood but struggled to put into practice. I used the last brief to focus on simply applying this principle to a simple animation. I found that by focusing on this area alone, I was able to successfully apply the principle and I feel that I understand it much better than before and I will be able to apply it to future animations.
During my collaborative practice I found that I enjoyed working as part of a team much more than when I had previously attempted to do so. I feel that I have improved greatly upon my communication skills and I was able to bring up concerns in a professional manner that resulted in problems being sorted in a mature way that didn’t leave any member of the team feeling unhappy about the decisions. I managed to keep up constant communication with my team members and I feel that I worked well as part of the team and contributed fairly to the project. In terms of communication of ideas, I feel that I did a much better job than previously in Character and Narrative. I feel that I was able to communicate my ideas in a clear and concise manner that was understood by all members of the team, and from that I was able to work with the team to create a successful outcome to the brief.
For the collaborative brief, I focused predominantly on post-production because I wanted to improve my skills in this area, as it is something that interests me. I feel that I have made a lot of progress with After Effects and I find that understand how to use the program to solve issues such as light balance, motion jitter and I can also use masks effectively.
Reflecting upon my time management for the module as a whole, I feel that this hasn’t been my strongest module for it. During the start of the module, I had a tendency to leave things until the end and left myself with very little time to complete the briefs. This led to me cutting a few corners and not doing as much development work as I would have liked, particularly for the first brief I completed. It also had an impact on other modules, such as Applied Animation. Despite the fact that it was unlike me to do this, I have learnt that I can lose motivation when I let things get on top of me, and this is something that I will always try avoid in the future. To do this, I will make lists of what I need to do on a weekly basis and take each task at a time, rather than thinking of the finished outcome.
Overall, I feel that I have enjoyed this brief as a whole and I feel that I have learnt a lot of things about myself both individually and as an animator. I also feel that I have developed on a number of skills that will benefit me in future projects and I am pleased with my progress overall.
Wednesday, 13 April 2016
Responsive: On Form
For my final individual brief, I decided to do a relatively simply brief called ONFORM. The brief consisted of creating a drawing/ sketch based on a shape that was published weekly to Tumblr. You were allowed to sketch whatever you desired so long as it was in black and white, you didn't change the proportions of the shape, you didn't rotate the shape and the shape was clear within the image you had drawn.
I thought that this was a nice little brief to have alongside my other two briefs and I could use it to focus on simply drawing, as character design and environment design aren't my strongest points. I wanted to use this brief as an opportunity to try and develop upon those skills a little and challenge myself to create a number of different character based sketches from the shapes each week.


I started off very simple and focused on idea generation and trying my best to come up with a single idea, as I struggled quite a bit to begin with. However, I found that as I went on, my line strokes got more confident and I was finding it easier to see things in the shapes and come up with multiple ideas. Once I started to get quicker at drawing and coming up with ideas, I began to look at adding shading to my drawings and taking it a little further, rather than just creating a simple outline sketch. I also wanted to push myself and begin to think about how I could make my drawings look less flat with the limited colour palette I had been given.
I found this brief extremely useful to me, as it challenged me to think of a number of different outcomes for different shapes and quickly. It helped me with idea generation and I noticed that I was able to come up with ideas a lot quicker towards the end of the brief. It also helped me to improve my digital drawing skills, which I will be able to take forward into future briefs. On top of this, I feel that I have managed to successfully create a series of sketches that are each different from the last that depict what I set out to achieve at the start. I have been able to create a character based sketch each week and I am pleased with my own progress.
Overall, I feel that this brief has been really successful and has helped me to improve upon skills that will benefit future projects.
Tuesday, 12 April 2016
Applied Animation: Research
In order to start animating, I thought it would be a good idea to get some research done on how these animals move in real life to help me make the characters move in a believable way. After out lecture with Sara we learnt that it was important to give the characters subtle behaviours as these are what make the whole performance more believable to an audience. So I sat down and looked up some videos on YouTube of the Robin and the Wolf to attempt to find any subtle behaviours that were unique to these animals.
I noticed that the Robin tends to be quite twitchy and jumpy and has very sudden movements that would be missed if you blinked and I feel that incorporating some of this, slightly not so subtle, behaviour into our character would help to create a better performance. I also noticed that the Robin's head moves quite a bit in an inquisitive manner and I also feel that this would be a nice little gesture to have our character do every now and then.
For the Wolf there wasn't much to go on, as they are very active animals so never really stay still throughout the clip. However, at around 9:10 the wolf laying provided me with a nice little clip of subtle behaviour. Wolves tend to move their ears a lot above the rest of their body (other than their tail) and they are constantly moving. This is something I should definitely consider, as the ear movements could coincide with the tone and mood of the dialogue. Their faces also have a lot of expression which is also something I will need to consider to help give my character a believable performance.
Responsive: Do It In Ten - Transition: Resolution
Reflecting upon how I handled this brief, I feel that I did a much better job than my previous attempt. This time I managed my time much more efficiently. This allowed me to not only complete the brief on time, but pay more attention to the actual animating. Having said this however, it isn't my greatest animation and the line work is a little sloppy in places, but I feel that the timing and spacing is a lot stronger within this animation than in previous ones I have completed over the year. Timing and spacing are two things I have never really quite been able to apply practically to my work, despite the fact that I understand them perfectly in theory. This time I was able to apply both fairly easily to my work and I feel much more confident applying both principles to other animations I work on in the future.
Submission
Overall, I am pleased with my final outcome despite the fact that the animation is a little weak. I feel that I have improved in an area that I have been struggling with for a long time and I am confident that this will help me to make better animations in the future. I have also managed to gain control over my time management once again, which is a huge relief and I feel better now that I am on top of things once again.
Responsive: Do It In Ten - Transition: Development
As I was designing the final shapes/ symbols that would be displayed within my animation, I thought about how I could make these shapes consistent throughout. This led me to use the pen tool in Photoshop, as this would make my lines a lot smoother and help me to keep the size and shape more consistent than if I were to draw them by hand.
I started out by drawing a quick sketch of the symbols on a base layer so I had an idea where each shape would appear within the animation. Although they were very basic, rough sketches, I found that it made it a lot easier for me to plan out how my lines would transition from shape to shape and which path they would take. This isn't something that I usually do, as I am more comfortable when I am doing straight ahead animation as opposed to pose to pose, however, this did benefit me massively and made the task a lot easier than I imagine it would have been if I was basing this on guess work. Pose to pose is definitely something I will consider using more of in future animations, as it helps me to keep the timings in place and takes away some of the guessing.
I had decided early on that I wanted my symbols to have a little bit of 'life' in them whilst the shapes were static and had decided that I would draw out the symbols on twos to give them a slight boiling effect so there wouldn't be any completely still shots. I found that this made the animation easier to watch and it didn't have any uncomfortable periods of no motion at all. However, I could have taken a little more care with some of the lines, as some of them don't quite match up and there are obvious mistakes. Having said this, I wasn't 100% focused whilst I was completing this animation, as I wanted to focus more on CoP and Applied. Also, although I found the animating quite easy, I did struggle to keep the first symbol, the Yin Yang symbol, consistent and it didn't look as neat as the other symbols. After I had moved on to other sections of the animation, I returned to it and altered some of the frames to make them appear more consistent, however I still couldn't quite manage to get it as steady as the other symbols, so I decided to leave it, as I felt that it wasn't worth getting wound up about.
Although the final symbol was quite complex compared to the others, it wasn't all that difficult to replicate. I did find that it was a little more challenging to keep the shape as consistent as the crowns, however I feel that I did a good job considering the shape was very symmetrical. Having said this however, there are some frames in which the lines are a little bit warped and it is noticeable, however, at this point, I wasn't too concerned, as I had more important projects to work on.
I started out by drawing a quick sketch of the symbols on a base layer so I had an idea where each shape would appear within the animation. Although they were very basic, rough sketches, I found that it made it a lot easier for me to plan out how my lines would transition from shape to shape and which path they would take. This isn't something that I usually do, as I am more comfortable when I am doing straight ahead animation as opposed to pose to pose, however, this did benefit me massively and made the task a lot easier than I imagine it would have been if I was basing this on guess work. Pose to pose is definitely something I will consider using more of in future animations, as it helps me to keep the timings in place and takes away some of the guessing.
 |
| Example of rough sketches |
I had decided early on that I wanted my symbols to have a little bit of 'life' in them whilst the shapes were static and had decided that I would draw out the symbols on twos to give them a slight boiling effect so there wouldn't be any completely still shots. I found that this made the animation easier to watch and it didn't have any uncomfortable periods of no motion at all. However, I could have taken a little more care with some of the lines, as some of them don't quite match up and there are obvious mistakes. Having said this, I wasn't 100% focused whilst I was completing this animation, as I wanted to focus more on CoP and Applied. Also, although I found the animating quite easy, I did struggle to keep the first symbol, the Yin Yang symbol, consistent and it didn't look as neat as the other symbols. After I had moved on to other sections of the animation, I returned to it and altered some of the frames to make them appear more consistent, however I still couldn't quite manage to get it as steady as the other symbols, so I decided to leave it, as I felt that it wasn't worth getting wound up about.
 |
| Yin Yang symbol |
Putting that issue aside, I worked towards completing the animation. I found the crown symbols the easiest to animate and keep consistent and I got these complete relatively quickly with no issues. I feel that this is the strongest section of the animation and I am really pleased with the timing and spacing I achieved within this section of the animation, as this is something I have always struggled to with whilst animating.
 |
| Animation Development |
 |
| Animation Development |
Although the final symbol was quite complex compared to the others, it wasn't all that difficult to replicate. I did find that it was a little more challenging to keep the shape as consistent as the crowns, however I feel that I did a good job considering the shape was very symmetrical. Having said this however, there are some frames in which the lines are a little bit warped and it is noticeable, however, at this point, I wasn't too concerned, as I had more important projects to work on.
I definitely feel that I am on the right track to completing this animation on time and to a good enough quality to submit and I am happy with the progress that I have made.
Responsive: Mega Crit
Last week , I had the opportunity to show all of the work I had completed so far for my individual brief and what I had completed for the collaborative brief. We had to make presentation boards and the focus was on professionalism and how we had presented them, rather than the content of work so this time I put a lot more thought into how I was going to present my work and decided to keep it simple and clean.


I kept the style of boards consistent throughout, changing only the logo and the description of the briefs where appropriate. However, I was a little self aware of how little work I had to put on my boards. As the majority of my work was animation based and one brief was still on going, I did really have much work to present.
Overall, I received a measly two comments, which both focused on showing development work. So I found this crit to be extremely unuseful. As I haven't done anything like this before it would have been nice to receive feedback that was useful and relevant, however this wasn't the case and I am a little confused as to what worked and what didn't regarding my boards. Having said this, now that I have completed all of the briefs, I will have more work to display on my final submission boards and I feel that this will look a better. Because no comments were made, I think I will stick to the design I created for this crit and just make sure that I don't overload the boards and keep them as clean and consistent as possible.
Despite the lack of feedback on my individual practice boards, the boards that Molly had created for out collaborative brief received a lot more feedback. However, these were also based around the work rather than presentation. I had set up a computer with a loop of our 4 animations playing with sound and people really liked what we had done and how we had approached the brief. I'm really pleased that people liked what we had done and I feel that the project was a success.
Overall, I don't feel that I have benefited from this crit massively, but I feel that I have a basic understanding of how to present my work in a professional manner.
Thursday, 24 March 2016
Responsive: Do It In Ten - Transition: Idea Generation
This months Do It In Ten theme is Transition and I wanted to use this opportunity to practice animating transitions and improve upon my timing and pacing, as I feel that I still struggle with these principles of animation slightly and would like to become more confident with them.
Because the term was so broad, I felt that I could keep the idea simple and focus more on developing my skills as an animator.
Before I can move on to actually animating though I need an idea. Like I said I wanted to keep it simple and easy, as I wanted to focus on developing my skills, however, I didn't want it to be too easy that I didn't challenge myself in some way. So I started with a mind map of ideas to see what ideas I could come up with that related to the theme of the brief.
| Mind Map |
Although I wanted to keep it simple and focus more on developing my skills, I explored a few ideas that weren't so simple just in case I came up with something else that I also wanted to explore. However, in the end I focused on exploring the idea of metamorphism. I want to create a shape that I can morph over the 10 seconds I had into different shapes. I feel that this will allow me to develop without getting too distracted by the subject I am animating. However, to make it a little more challenging for myself I also want to try and make the shapes link and 'morph' fluidly, as this will make the animation much more interesting and help me to develop my skills further.
With this in mind, I decided to focus upon light and dark, as I felt that this would be the easiest to create recognisable symbols for as well as providing me with numerous shapes to choose from. So I did a small amount of research into opposing symbols that represented light and dark and I found that the most common ones were the Yin and Yang symbol, the sun and moon, the king and queen and not so commonly, the alchemical sun and moon and the alchemical ouroboros and fire drake.
Having a quick look over what I had found, I decided that it would be best to stick to things that were more commonly known, this led me to focus on only 3 symbols, yin and yang, king and queen, and sun and moon. Given that I only have 10 seconds of animation time, I feel that 3 symbols will be appropriate for the animation and give me plenty of time to animate the transitions in between.
I feel that I have a good starting ground to begin working from and I feel that this time around I won't feel rushed or under pressure, as I have given myself a much less ambitious idea with more time to complete it, unlike the last time I attempted to complete a similar Do It In Ten brief.
 |
| Idea Development |
With this in mind, I decided to focus upon light and dark, as I felt that this would be the easiest to create recognisable symbols for as well as providing me with numerous shapes to choose from. So I did a small amount of research into opposing symbols that represented light and dark and I found that the most common ones were the Yin and Yang symbol, the sun and moon, the king and queen and not so commonly, the alchemical sun and moon and the alchemical ouroboros and fire drake.
 |
| Symbol Research |
 |
| Chosen Symbols |
Applied Animation: Refining Textures
Following on from our progress meeting, I looked at the two environments we had discussed and decided to explore further and experiment with refining these a little to create more depth and make the textures and colours work together as best as possible.
Taking on board everything we discussed in our progress meeting, we went away and pointed out all of the aspects that we liked in each environment, so I could go away and produce some final environments to show Katy what we would be working with. I also had to extend the Boar environment, as this will also act as our opening title scene when the camera pans along.
I started with the pan shot and decided that it would be easier to make the trees different shades if I drew them out in stages. This way I was able to see where I was placing each different shade and it helped me to make the shades more varied rather than in lines like before. Straight away I saw a different and I was pleased that I had managed to include more depth within the environment, as it made the scene look a lot less flat and gave a better idea of what kind of environment the animation was to be set in.
I then went on to add the darker ground texture Katy had created, as this is what we had decided upon and the lighter sky texture to finish the environment, However, after taking a step back and looking at the environment as a whole, I noticed that the bottom of the tree lines just seemed to end and I felt that it didn't quite fit together and it looked odd, which would distract from the main focus of the animation. This led me to look back at our mood boards and animations that were created in a similar way to ours and see how they had achieved it. I took the most influence from The Secret of Kells, in which grass and plants were drawn over the tree trunks and out of the ground. This gave me the idea to draw grass at the base of the trees and on the skyline to help the layers blend together a little better.
I then moved on to the two wolf environments, adopting the same technique as before. For the rock and I used the same texture as before, however I simply rearranged it and removed the majority of the green as it stood out from the ground a lot better. I also darkened the grey using levels slightly to make it contrast a little better. For the second environment I left a lot of the green on show, this was to help create variation within our environments and to help keep it clear that it was a different camera angle.
The most challenging part of these two environments was the fog that we wanted to have. I played around with different brush sizes and hardness and found that a soft brush sized 800 with an opacity of 33% worked the best to create the most realistic fog effect without the help of plug ins and effects. Although such effects are available to us, we wanted to animate the fog in the background and we felt that we would have more control over the outcome if we animated it in Photoshop.
 |
| Possible Boar Environment |
 |
| Possible Wolf Environment |
Taking on board everything we discussed in our progress meeting, we went away and pointed out all of the aspects that we liked in each environment, so I could go away and produce some final environments to show Katy what we would be working with. I also had to extend the Boar environment, as this will also act as our opening title scene when the camera pans along.
 |
| Pan Environment Progress |
 |
| Development |
 |
| Development |
 |
| Development |
I started with the pan shot and decided that it would be easier to make the trees different shades if I drew them out in stages. This way I was able to see where I was placing each different shade and it helped me to make the shades more varied rather than in lines like before. Straight away I saw a different and I was pleased that I had managed to include more depth within the environment, as it made the scene look a lot less flat and gave a better idea of what kind of environment the animation was to be set in.
 |
| Adding ground |
 |
| Adding sky |
I then went on to add the darker ground texture Katy had created, as this is what we had decided upon and the lighter sky texture to finish the environment, However, after taking a step back and looking at the environment as a whole, I noticed that the bottom of the tree lines just seemed to end and I felt that it didn't quite fit together and it looked odd, which would distract from the main focus of the animation. This led me to look back at our mood boards and animations that were created in a similar way to ours and see how they had achieved it. I took the most influence from The Secret of Kells, in which grass and plants were drawn over the tree trunks and out of the ground. This gave me the idea to draw grass at the base of the trees and on the skyline to help the layers blend together a little better.
 |
| Adding grass |
After doing this, I showed Katy and she agreed that the drawn grass did help to bring it all together. However, I still felt that something was off with the perspective, the ground was too flat and I felt that it was letting the whole environment down. So I decided to add another layer of ground, which I feel helps to give it that extra little bit of depth and it doesn't make it look like the trees are floating on the horizon.
 |
| Final Boar Environment |
I then moved on to the two wolf environments, adopting the same technique as before. For the rock and I used the same texture as before, however I simply rearranged it and removed the majority of the green as it stood out from the ground a lot better. I also darkened the grey using levels slightly to make it contrast a little better. For the second environment I left a lot of the green on show, this was to help create variation within our environments and to help keep it clear that it was a different camera angle.
 |
| Different tree layers |
 |
| Textured trees |
 |
| Ground, rock and sky |
The most challenging part of these two environments was the fog that we wanted to have. I played around with different brush sizes and hardness and found that a soft brush sized 800 with an opacity of 33% worked the best to create the most realistic fog effect without the help of plug ins and effects. Although such effects are available to us, we wanted to animate the fog in the background and we felt that we would have more control over the outcome if we animated it in Photoshop.
I found that the brush strokes worked best when I layered them up rather than increasing the opacity, so I created 5 separate layers that were in between the different tree layers to layer up the fog. Katy is also happy with the results and we've agreed that this would be the most appropriate method to take for this aspect of the animation.
Overall, we are both happy with the final environments and feel that we have what we need to animate with. If we feel the need to alter some of the camera angles within our animation I think it will be easy enough to add a new environment now that we have the main ones complete.
 |
| Final Environment 1 |
 |
| Final Environment 2 |
Overall, we are both happy with the final environments and feel that we have what we need to animate with. If we feel the need to alter some of the camera angles within our animation I think it will be easy enough to add a new environment now that we have the main ones complete.
Tuesday, 15 March 2016
Responsive: Dazed - Submitting
Today Molly, Katy and me sat down together and submitted our response to the Dazed brief on D&AD.
 |
| Our Submission |
The ' Face'
The 'Book'
The 'Crowd'
The 'Dance'
The Making Of
Overall, I'm really pleased with how we managed to turn this project around in such a short time frame. I feel that we have managed to portray our idea of creative freedom as an individual and as a collective, whilst having fun and taking a relaxed approach to the brief. I am also pleased with the development I have made in my communication skills and as a team member. I feel that I have managed to work a lot better as a group this time around compared to the first time I worked collaboratively. I feel that I can communicate my ideas in a more coherent way and keep up communication. I also feel that we worked really well as a group and that we managed to split the work load quite evenly.
Working with someone from a different course has also given me an insight into how working with someone with a different skill set can be beneficial and help to create interesting and fun work.
Responsive: Dazed - Further Post Production
Now that the stop motion video was complete, I was able to help Molly and Katy with the remaining 3 videos. I can happily say that there wasn't much left to do, as they had been busy working on it whilst I was editing the stop motion.
Katy was working on the 'Crowd' video and Molly had taken the 'Dance' video, which left the 'Book' video, so I decided to take this and work on the first 4-5 seconds whilst I waited for the animated clips from Katy and Molly. Sticking to the theme of fun and 'wacky', I stuck to simple line work and patterns like the others had and I feel that I managed to replicate what the other two had created.
Once the others had finished, Molly took the the last of the 'Book' video and Katy worked on the description, title and statement for our submission. I began the process of post production once more to add in the floating patterns that Katy and Molly had designed and prepped earlier in the project. The idea was to have the GIFs masked out and floating in the background of the videos.
It was a simple process of masking and key framing, which took no time at all and I had no difficulty with the process. I then attempted to add them to the footage, however, I wasn't too sure whether the floating blobs fit properly with the rest of the animation, so I asked the others what they thought. They seemed to really like it and didn't suggest that I remove them, so I decided to stick to it, as the others felt that it looked good and agreed to have the blobs in the final footage.
Katy was working on the 'Crowd' video and Molly had taken the 'Dance' video, which left the 'Book' video, so I decided to take this and work on the first 4-5 seconds whilst I waited for the animated clips from Katy and Molly. Sticking to the theme of fun and 'wacky', I stuck to simple line work and patterns like the others had and I feel that I managed to replicate what the other two had created.
Once the others had finished, Molly took the the last of the 'Book' video and Katy worked on the description, title and statement for our submission. I began the process of post production once more to add in the floating patterns that Katy and Molly had designed and prepped earlier in the project. The idea was to have the GIFs masked out and floating in the background of the videos.
 |
| Making out the pattern |
 |
| Adding the masks to the footage |
It was a simple process of masking and key framing, which took no time at all and I had no difficulty with the process. I then attempted to add them to the footage, however, I wasn't too sure whether the floating blobs fit properly with the rest of the animation, so I asked the others what they thought. They seemed to really like it and didn't suggest that I remove them, so I decided to stick to it, as the others felt that it looked good and agreed to have the blobs in the final footage.
Overall, I'm pleased with the final outcome and I feel that we are in a strong position to submit.
Responsive: Dazed - Stop Motion Post Production
As Katy and Molly began production on the edited footage, I got to work on the post production of the stop motion. As I mentioned before, the levels of the frames are off due to us not taking more care when setting up our equipment, meaning I had a lot of work to do before I could say it was finished.
In terms of attempting to fix the jumpiness of our footage, I tried out the motion stabiliser in After Effects to see how this would effect the footage. This was something that I had never used before so I didn't know what to expect from using it. A lot of this was done by experimenting, as i was new to it, but I found that the motion tracker worked better when placed on an area of the footage that had high contrast so I tried to focus on these areas when I was placing the tracking points.
As the footage was separated into 5 different clips I had to place the trackers in different places to achieve the best possible outcome. After I'd done this to the first clip I played the footage back and showed Katy and Molly, as I was struggling to see much of a difference between the two as I had been staring at it for quite a while.
Although the motion track stabilised the jumpiness slightly, it didn't have all that much of an effect on the overall footage. However, I felt this had something to do with where I was placing the trackers, so I attempted it again but with the trackers in different places. This seemed to work a lot better, so I used the motion stabiliser on the remaining footage too.
Mike had suggested that I edit the levels frame by frame in Photoshop, which I did however I couldn't achieve the consistency that we wanted through this method. I also found that it was extremely time consuming, which is something that we couldn't really afford as the deadline was only 3 weeks away at this point. I was also struggling with the file size due to there being so many frames.
This led me to attempt to fix the issue in After Effects, as this would give me the ability to alter them frame by frame. Although I had to alter the levels frame by frame and key frame almost every frame, I found that I was able to achieve much more consistency than when I attempted it in Photoshop, it was also a lot less time consuming. Having said this, there was still a flickering of colour however, it wasn't as noticeable. If I had more time I would have put a lot more time into making the levels as consistent as possible. Despite this however, I feel that the levels have turned out quite well considering there were some huge level jumps on certain frames.
 |
| Adjusting Levels in After Effects |
 |
| Position of Motion Tracker |
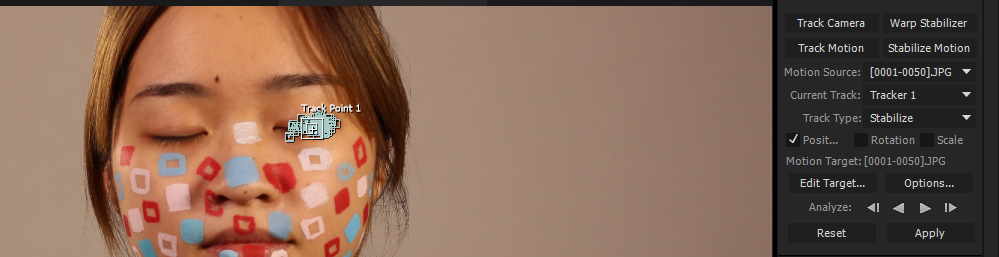 |
| Position of Motion Tracker |
As the footage was separated into 5 different clips I had to place the trackers in different places to achieve the best possible outcome. After I'd done this to the first clip I played the footage back and showed Katy and Molly, as I was struggling to see much of a difference between the two as I had been staring at it for quite a while.
Although the motion track stabilised the jumpiness slightly, it didn't have all that much of an effect on the overall footage. However, I felt this had something to do with where I was placing the trackers, so I attempted it again but with the trackers in different places. This seemed to work a lot better, so I used the motion stabiliser on the remaining footage too.
Footage before Motion Stabiliser
Footage after Motion Stabiliser
Once all of the clips were done and I had edited them together I watched it through and decided that it would be worth altering the position of some of the frames that weren't stabilised enough with the trackers. This was a simple task of key framing the position of the frames where I felt it was necessary.
 |
| Altering position key frames |
The overall effect seems to work in our favour and I feel that I have managed to fix the issues we had with the footage to a high enough standard to use for our submission. I also feel that I have learnt a lot in terms of how deal with footage that isn't 'perfect' and I have improved on my post production skills. However, this isn't to say that I realise the importance of getting the footage as 'perfect' as possible whilst shooting, as it makes it easier to work with in post production.
To complete the video, I put the footage to a soundtrack in Premiere and also added the Dazed Media logo. We are happy with how this turned out and glad that I was able to edit the footage we had to create something that would fit with the rest of our footage and with our ideas.
The 'Face'
Subscribe to:
Comments (Atom)