After speaking with Lauren about the characters that we had been exploring, she suggested that we look at animals, as we weren't 100% sure about 'squishy' things or robots. I was happy to explore a few more options so long as we focused upon animals that would be easy to represent with very iconic characteristics, e.g. rabbits, giraffes, elephants, etc. Lauren agreed to this, as she had already started to look at animals before she suggested it to me, so we both went away and came up with a few ideas that we thought would work well.
I focused on creating really quick sketches of animals I thought would be appropriate for our story and I then showed these quick sketches to Lauren to see what she thought. We both agreed that the mouse would be difficult to animate with its tail and the pig's legs wouldn't be long enough to create an easy child equivalent. Therefore, we were left with the giraffe and rabbit. At the time I wanted to explore the rabbit, as I feel that this is a more iconic animal than a giraffe so I tried to create a few different designs for rabbit but I struggled a little to make them appear different. (Max also drew a rabbit for me in the middle of my designs).
The page with Max's drawing
However, after struggling with this idea, I went to Lauren again, who wanted to explore the giraffes more, and asked her why she wanted to do giraffes. The reason was because they were quite clumsy animals when they are babies and she felt that they'd tie in well with our story. I agreed with this and suggested that deer could also be an animal that we looked at. Lauren agreed to this and so we went away and did drew a character based on a deer, whilst keeping it a biped model to make it easier for us to animate and create in Maya.
I created two slightly different designs to show to Lauren and after a while we decided that the second design was more appealing and worked better alongside Lauren's designs. However, she still really wanted to go with giraffes, so we came to a compromise of sticking to the design above, but with the skin of a giraffe.
In Monday's session Sara came in to talk to us about character and story design and gave us an insight into how important it is to make sure that you get these elements right, as they are what make the animation.
Character design is a process and the character design should always serve the story, rather than the other way around, which is why it is important to write and study your story before you begin to focus on the characters. When writing a short story, there a few key elements that should be considered for a successful short story. The story should be character driven and that character should be flawed to make the character more appealing and relate-able. The goal should be urgent and introduced immediately to fit into the short time frame and there should be interaction between characters or props. Alongside these key elements there are a few 'tools' that can be used within short storytelling. Playing on conventions is something that a lot of animators do, as it often gets a positive reaction from the audience. Other tools also include sound design, simplicity and using a story loop, twist or gag. Good examples of this are Oktapodi and Bird Box Studios' A Christmas Wish.
Oktapodi
A Christmas Wish
Although story development is important, it is also really important to get the character design right, as it needs to match the tone, mood and style of your story, whilst also being suitable for your target audience. Similarly to story design, character design also has some key elements that are useful if you want to design a particular style of character.
Within character design there are three core shapes that are used - circle, square and triangle. Characters that use the circle shape are often seen as friendly, approachable, kind characters, whereas triangle characters are often seen as mean characters due to their sharp angled features and body shapes. Square body shapes reflect strength and stability and can be used as either 'bad guys' or 'good guys'. More often than not, the body shapes of characters are a combination of these core shapes and the characters often contrast each other to help distinguish between personalities (e.g Pinky and The Brain from The Animaniacs).
Overall, it is important to focus on the small details within both character design and story design, as they have a huge impact on the way your story is perceived by an audience.
Today, I sat down with Lauren and we went through the storyboard for our animation to clarify what we wanted from the story and to see how much time we had for each element of our narrative. Because the story we're doing is going to be character driven, we made the camera quite static in terms of it not turning much and not panning very often, although we are willing to change this if we feel that this will make the animation better. However, we did focus on trying to create a range of different camera angles throughout the story.
Overall, I feel that the narrative works well and I feel that we have enough content to fill the 60 seconds. I'm pleased with the shots and action that we have and I feel that we have managed to successfully communicate our ideas in a coherent manner.
Progressing forward with our project, Lauren and I had decided that we wanted to go down 2 possible routes for character designs, these being either robotic or more of a 'squishy' nature. Following on from the initial character designs I'd been playing around with a few weeks ago, I also did a few quick sketches of different robot shapes and few more 'squishy' character shapes, so Lauren and I could look at them and make a decision on which characters we wanted to explore and develop further.
Previous Designs
Previous Designs
Robotic Designs
Robotic Designs
Although there a variety of different shapes, Lauren told me that she wanted to go more detailed than this, as she felt that she would be able to handle designing a slightly more complex character. Personally, I feel that we shouldn't go into too much detail, as even simple shapes appear to be deceptively easy to create in Maya, so we have come to a compromise of a little more detail but not too much.
After discussing which ideas we liked best, Lauren showed me some character designs she had been doing of animals and we decided that we'd like to focus on the animal characters more, as we feel that these will work best for our story, rather than the robots.
In today's session we moved on to creating the skeleton of our model. Although I've enjoyed building the model, I was glad to be moving on to something other than extruding faces and edges. This task was actually really simple and straight forward, so I was able to move through the task fairly easily.
Arm and Hand Joints
I found the finger joints slightly more challenging because I had to line them up with the slightly bent fingers, but I feel I managed to do this well in the end. I then 'parented' up all of the joints that would be controlled by the head, the chest and the hips. Like I said, this process was extremely simple and all that I had to focus on was making sure I was in the right plane when placing the joints down, so as not to make a mess that would be difficult to clean up.
Parented Joints
Clavicle Joint
Hip Dislocator
Overall, I'm really pleased with myself for getting to grips with the task really quickly and I feel that I am making really good progress within this module. I feel that I have learnt from my previous mistakes and I have been able to work effectively and efficiently throughout the task given to me to produce a good base to continue to work from. This has given me a lot of confidence for when I start to work on my own model.
In Monday's Maya session we looked at how to unwrap our mesh to create a UV Map, so we can add textures to our model. In order to do this I had to unfold the map below into something more manageable. Once I'd done this, I was able to cut seams along my model and press a 'magical' button (unfold) and unwrap my model to create the UV Map.
Unedited UV Map
Un-cut UV Map
Unfolded UV Map
Looking at my unfolded UV Map I was able to see that my model was quite nicely made apart from the mouth, which I had problems with fixing. But after asking Mat how to make it a more even and neater shape, I realised it was as simple as rearranging the UV points within the map. All that was left was to rearrange the different sections to make it fit nicely in the box and UV Map the eye lids.
Edited Mouth
Complete UV Map
Overall, I feel that I have developed a great deal in the last couple of weeks in terms of my ability to use Maya to create what I want. I feel that my understanding of the software has improved and I am confident that I will be able to use the program to create my own character in the next few weeks.
Continuing on from the session earlier in the week, I completed the Maya model in my own spare time, as I wanted to get on with it and complete it. Again I found the process quite simple until I reach the hand, which is where I struggled a few times and made multiple mistakes.
Arm and Leg
Foot
Continuing to use the extrude tool mainly, I was able to complete the main body and head of the model with ease and I was really pleased with how quickly I was able to pick up the tools and use them effectively. I worked my way through the tutorials and I had managed to complete the hand and the first finger with little trouble, however, when I came to do the second finger I started to experience some problems when duplicating the first finger and when I had to snap the vertexes together.
First Finger
Second Finger
After re-watching the tutorial to see if I had done something wrong, I realised that I had done everything as Mat had and it was confusing me as to why it wasn't working for me. At this point I was getting really frustrated and annoyed that I couldn't get the duplicated finger to move. However, the problem was simply caused by me not selecting the fingers properly, and it was solved by me paying more attention to what I was doing. Although I am confident in using the software, I need to pay more attention to how much time I am spending sat at the computer, as I make more mistakes if I forget to take a break. With this in mind I will make sure to take more breaks so I don't make little mistakes like this one in the future.
Completed Hand
Completed Mesh
Overall, I am really pleased with the progress that I have made over the last few days and I feel that this task is going really well. I'm able to overcome problems I encounter and I have managed to make a model and a good quality to work with.
During this weeks session I worked at creating a model, that Mat gave us the template for, in Maya. Although I'm not sure that 3D animation is something I 100% want to go into, I did really enjoy learning how to use the software properly and create something that I can use to animate with.
With the help of Mat's video tutorials, I was able to start sculpting the bottom half of the body. Despite the fact that I thought Maya was quite difficult to use, I realised that I was having very little difficulty getting my head around how to craft what I wanted. Only having a limited amount of tools to focus on made it a lot easier to work with Maya, as it made it seem a lot less complex and daunting.
Original View
Smooth Preview
Once this was completed I moved on to create the upper half of the body. Although this was a very similar process I did encounter a small problem when I reached the shoulder. In order to extend the arm, I had to extrude part of the body outwards. However, I selected this tool to extrude, but then decided not to use it and adjust some of the vertexes first. It isn't apparent at all that this would cause any problem and there was no indication that I had extruded the edge by 0px. But I had, and it made it so I couldn't remove the border edge at a later and merge the edges together. In order to fix this, I should have pressed Z (undo) if I had wanted to deselect the tool, but as I had gone too far ahead, I had to re-load a previous save file and begin again.
Torso
Shoulder
Overall, I feel like it was a very productive session and I feel confident that I'll be able to finish off the model with little stress. I feel that I have managed to get to grips with Maya very quickly and I am pleased with my own progress.
In order to push the character design in the right direction, I decided to do a bit of research to help me get the idea of a human-like character out of my head. I watched a few animations and thought of others in order to get an idea for the kind of simplicity I am looking for.
Because Lauren has already started to look at child characters more, I decided to focus more on the adult character, as we are looking at similar things anyway.
I looked at a few of Tim Burton's characters, in particular 9 from the film 9. I find that he has a very simple yet distinguishable body shape that I'd like to incorporate into my designs, as I feel that it would be easy to work with whist being an effective design. I also looked at Little Big Planet, as it follows a very similar format, with the characters having a very simple body shape with minimal detail. I also quickly looked at Wallace and Gromit and Creature Comforts, as this was an influence we discussed earlier in the week when we were considering an animal-like character.
Pocoyo was also mentioned earlier in the week whilst we were discussing our ideas and I feel that it is also a simple design, however, he is a human and although he looks very simple, it may not be as easy as it looks to create the facial movements of a similar character. I also decided to look at robots, as this is also a possibility for characters.
If we were to go down this road, I feel that a character similar to Ben from Treasure Planet would be a better design, as he is made of simple shapes and his joints are very clear, which would make it easier to animate. Finally I looked at an animation called The Maker because I liked how the characters were simple, yet they still worked really well within the story.
Lauren decided that she wanted to seek advice from Matt on which idea would be better to pursue and it was pointed out to her that our first idea with the characters being pushed and pulled may be a little harder to achieve but would still be achievable. Although we liked that idea, we decided against Road to Nowhere in the end, as we don't want to put too much pressure on ourselves for our first project.
With this decision made, I suggested that we completely avoid making the characters human, as I felt that Lauren's initial designs would be difficult to model in Maya and the parent character would be even harder, as it would be a more developed version of the child character. Lauren was happy to agree to the suggestion and we will focus on non-human characters when we come to design our characters.
Looking at our idea for Leap of Faith I wanted to establish a baseline narrative for us to start thinking about. Breaking our initial idea down into a beginning, middle and end we came up with this:
Beginning: Scene opens with the parent placing the child on the floor standing and slowly moving back before beckoning the child to come towards them.
Middle: The child makes many attempts to make it towards their parent. This section of the animation will be a montage, so the camera angles will change and the characters clothes may change to portray the passing of time. The child begins to become more stable towards the end of the montage.
End: The child finally manages to walk towards the parent and they celebrate the victory in some way (e.g. they hug).
Building a little further upon the narrative we also spoke briefly about possible environments this could be set in and we came up with either a garden or a living room. Depending on which style of character we decide to go with, the environment will match that style. For instance, if we chose to use robots (as this is a possibility we are going to explore) the environment would have a metallic style to it.
After narrowing down our ideas to just the two, Lauren and I had to choose which idea we wanted to run with, which proved difficult, as we felt that both ideas had equal potential. I started by writing down our ideas in a clearer way and potential character ideas for each idea in the hopes that it would spark more of an interest for one of the ideas.
However, this failed to make it any easier to choose, so Lauren suggested that we start with initial character designs, thinking this would help to motivate us to make a decision. We decided to start with the child character for our Leap of Faith idea and this is what I came up with. Personally, I wanted to keep to a very basic design, as I thought that it would be the easiest to replicate in Maya, as there wouldn't be any difficult shapes.
Although I managed to get a few drawings down, I still don't feel any closer to figuring out which idea I'd like to run with, so we will discuss the narrative further before going on to character design.
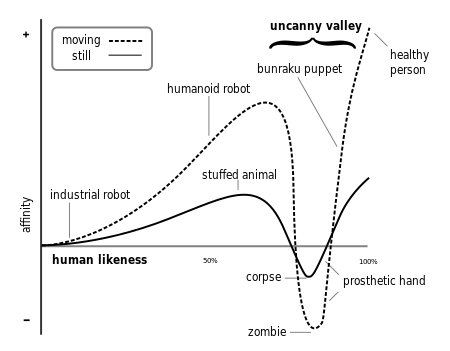
When looking into 3D modelling it is important to keep in mind the limitations that come along with using the method within animation. One limitation of 3D modelling is uncanny valley. This is a phenomenon that occurs when features of a character look and move almost, but not quite naturally, which results in some observers feeling repulsed and uneasy by the appearance of the character. Uncanny Valley was proposed in the 1970's by Japanese robotocist Masahiro Mori, who stated that the more human a robot appeared in both looks and behaviour, the more endearing it would be, but only to a certain point, at which observers would start to have a negative effect towards the character and wouldn't see them the same way, as they would other characters. This is referred to as 'the uncanny valley'.
There are many cases of the uncanny valley within 3D animation, for example, The Polar Express, Mars Needs Moms and Beowulf are all good examples of uncanny valley.
The Polar Express
Mars Needs Moms
Beowulf
Within each of these animated films, the characters lack a sense of consciousness and are said to appear 'dead behind the eyes' and to look 'creepy' or eerie. The uncanny valley demonstrates the limitations that are present when trying to achieve realism in animation, but there are some things that an be done to reduce this limitation. For example, only using motion that matches the realism of the animation will make the characters easier to 'digest' for the viewers. Another really important factor to consider when using 3D modelling within animation is focus on the eyes and the facial expressions. Whilst body language plays a big role in portraying emotion, so do the eyes and facial expressions of the characters. Less attention should be paid to the detail within the eye and more should be paid to making sure that the eyes are expressive and alive. The Adventures of Tintin: The Secret of The Unicorn is a really good example of steps being taken to reduce uncanny valley. The characters within this film appear to have a 'conscience' due to the fact that attention has been put into making sure that the eyes express emotion.
The Adventures of Tintin: The Secret of The Unciorn
After learning about the importance of acting for animation earlier this week, I was given a task in which I had to pose the model I was working with earlier in the week into poses that represented a choice of five emotion states. Out of the multiple states to choose from I decided to go with; confusion; amusement; exhaustion; fear; sadness, simply because these were the ones that I had instant reactions to in term of ideas to what I could create.
A part of the task required us to take reference photos to work from, and from these I chose my favourite ones and modeled the character based on these references. Although I felt a little apprehensive about posing in front of my friends, I did actually enjoy this part of the task and found it really useful when I came to model my character. Here are my results;
Amusement
Confusion
Exhaustion
Fear
Sadness
Overall, I am really impressed with how well I have managed to pose my model despite the fact that I'm not at all familiar with Maya and I found it fiddly to get the character into some of the more slightly elaborate positions. Although I feel more confident using Maya now, I still feel that I will need to practice some more with this model before I begin to make my own for my animation.
In this weeks seminar we talked about the importance of body language and how it is used within animation to help portray, not only the personality of a character, but also the narrative. Body language helps to tell the story even without any sound or dialogue, so it is important that the characters have the appropriate body language. A really good example of this is the Big Hero 6 character test.
Although there is no sound to the animation and there are no other characters present within each scene, it is very clear what the character is doing and the character's personality is also very clear. I need to keep in mind the importance of using references when figuring out how my character will move and behave, as it will help me to capture the right body language and help to tell a clearer story of my character.
Sitting down with Lauren, we went through the notes we made yesterday and started to flesh out our ideas a little and explore other ideas and titles to see if we could come up with something more substantial. Reflecting upon what we came up with for the title Opposites Attract we established that the narrative would most likely steer towards the interaction of the characters. Based on this we came up with a few ideas revolving around one character helping another character, and other ideas which took the title more literally. However, after a few ideas we struggled to think of anything else that we felt would relate to the title and make a good narrative. Adrift created a similar problem for us, as we aren't comfortable with the idea of animating 3D water. However, this could be solved with using mixed media within our animation.
Expanding upon our previous choices we decided to look at the title Road to Nowhere, as we realised that this has potential. We came up with the idea of having two characters that were opposite in personality that could somehow travel to the destination of 'nowhere'. I really like this idea, as I feel that the characters could have a lot of personality and the narrative would be clear to construct in the short amount of time that we have.
Finally we touched upon Leap of Faith. Sticking with the idea of a parent pushing the child to take a leap of faith, we decided to stray from the bird idea and more towards a less literal meaning. We came up with the idea of a child learning to walk and creating a montage of the child attempting time after time before eventually getting it right. I also like this idea and feel that it would be a good choice to go with, as again the narrative would be easy to portray throughout the animation.
Overall, we have decided to focus upon the last two of our choices and develop them further, as they aren't overly ambitious, yet have the potential to be effective and tell a clear narrative.
In order to help us with the narrative side of this brief we were given a selection of titles to choose from and after looking over them all there were a few titles that stood out to me and my partner (Lauren). Opposites Attract and Rivals were the first two ideas that stood out to us because of a few reasons, the main one being that the narrative could focus upon how the characters interact with each other. These two titles also opened up the opportunity to create characters that are likable and that could have comedic values, which could help to lead the narrative.
Alongside those ideas I also thought that Leap of Faith and Adrift could also work in a similar way to the other two titles but with more focus on the characters having to rely on one another rather than how they interact.
In terms of character design we deiced that the characters should be quite simple in shape and detail, with human-like qualities and characteristics. However, I want too much realism, as realism risks falling under the uncanny valley category.
After being briefed, we spent the afternoon recapping on how to use Maya and the basic tools within the program. Once we'd done that we got our first look at a rigged model to see how it would work and move when we come to create our own in the next few weeks.
I found it quite easy to manipulate the model and move it into the positions I wanted with little effort. However, I did learn that if you moved certain parts of the body too far, such as the hips, the model would collapse in on itself and bend out of shape. Overall I had a lot of fun with this tutorial and I feel confident that I will be able to move my own rigged model with little stress (if I make the rig correctly).
Towards the end of the session we were briefly introduced to UV mapping, which I used to add create a texture in Photoshop to then add to my model.
It's the start of a new uni year, and with the new year comes a new brief, which I'm actually pretty excited about because it's giving me the chance to explore and experiment with 3D animation.
For the brief we are required to work in pairs to produce an animated narrative between two characters. Although I'm really excited at the prospect of working in 3D animation, I'm also quite nervous to get stuck into this project, as there is a lot of work to be completed in such a short period of time with a program I'm not all that familiar with. I'm also feeling nervous about working in pairs because it's not something I do often and I'm not used to having to compromise on my ideas.
Nevertheless, I am determined and, despite being nervous, looking forward to see how I will do in this brief.
In order to finish off my animation in time for submission, all that I needed to do was add the titles and the sounds, which was pretty straight forward and hassle free.
I started with the titles, as I decided I wanted to add them in, in After Effects, as I wanted to animate the main title. It took me quite a while to figure out the style I wanted to go for, as I obviously wanted it to be sympathetic to the story. In the end I decided to go for a font that was as close to the font used on the books as I possibly could, but I ended up actually finding the exact font and using that instead.
When placing the assets into After Effects I had trouble with the resolution, which I had learned from the final crit that some of my assets were a really low resolution for some reason, so I decided to place the assets back into the composition and this seemed to solve the problem (however this didn't work for the turtle). I am really happy with the overall style and theme of the titles and I feel that they work really well with the overall aesthetic and tone of the animation.
Next was obviously the sound, which I found really easy to add in using Premiere and I had no hassle whatsoever. However, I wasn't happy. I didn't have enough natural sound to fill in the spaces that had no sounds, so the whole animation was filled with these little bursts of sound rather than a continuous flow of sounds. At this point I was really disappointed because sounds were something that I didn't really have time to experiment with after I encountered my problem so close to the deadline. There isn't much I can do in order to collect a soundtrack to place in the background before submission so I will have to make do with what I have.
Having said that however, I did manage to put together a single animation with an example of a soundtrack that could possibly work with the animation. But I do feel that the music is too overpowering. Despite this though it does show that the animation works a lot better with an added soundtrack.
After realising this, I have decided to collaborate with my dad (he's a musician) to create a soundtrack to go with the animation in time for the final exhibition in case I decide to place this on my showreel. Overall, I am disappointed that I didn't keep on top of my time management and that I didn't prepare for problems such as I encountered, but it has taught me to create multiple back ups of my work and to never work from the original file.